Organizations
An organization in Energy Hub is a logical entity that represents your business. You set up an organization to model your facility, energy networks, loads, and usage types based on how you manage them. The organization model includes locations, equipment and monitoring devices that are providing the measurement data for the loads and supplies in your facility. A well defined organization makes it easy for you to set user roles and access permissions. It also results in automatically created information views that match how you run your facility.
Energy Hub uses the organization model to analyze and aggregate the energy data and to present the results. For example, you can investigate issues based on your facility layout, such as sites and buildings, or based on usage types, such as heating or lighting.
An organization has a name, an image icon, and users. Only the users assigned to an organization can access it.
Regions, sites, and site layouts
Regions, sites, and other locations define the physical layout of your facilities in the organization model.
How detailed you model your facilities can vary. It depends on your type of business, the installed monitoring devices, and how detailed you want the energy information to be.
You can use the following elements to build the model:
- Region (A large geographical area, for example state, province, country)
- Site (A specific location, with a street address)
- Building
- Floor
- Area
- Space
- Production Line
- Zone
Your model can include one or more of each of these elements. At a minimum, you need to define one site.
Example organization:
| Organization name | – | Mindt Chocolates |
| Region | – | Canada |
| Site | – | Halifax Factory |
| Building | – | Main Building |
| Floor | – | Factory Floor |
| Production Line | – | Dark Chocolate Preparation |
If you are using the NABERS functionality in Energy Hub, consider setting up your buildings in the organization model with clearly defined locations for central services, common areas, and tenant spaces. This makes it possible to use Energy Hub data, instead of manually entered data, when creating NABERS ratings.
Organization model best practices for NABERS:
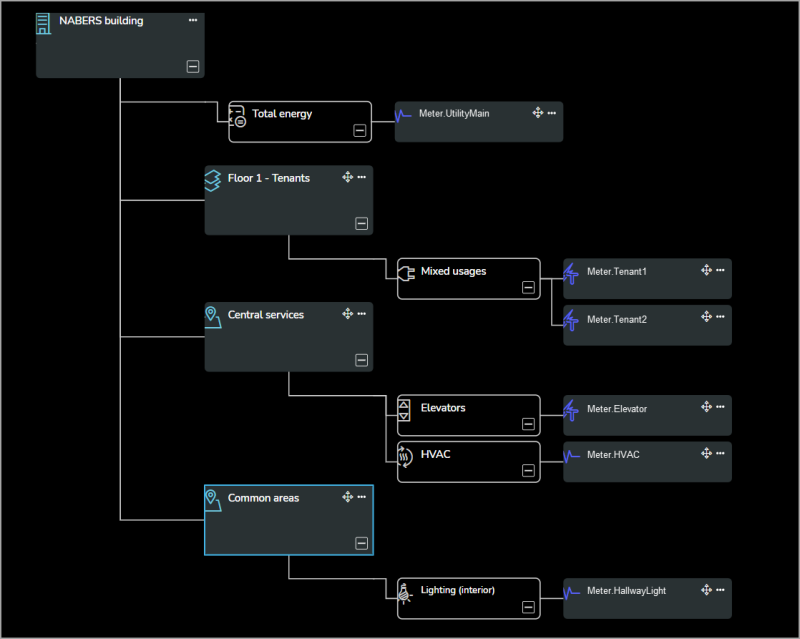
- Create child locations for a building (floors, areas, zones, ...) to represent the NABERS relevant spaces (central services, common areas, and tenant spaces).
- Have monitoring devices installed in the building that provide consumption data for these spaces.
- Do not add loads directly to the building location in the model.
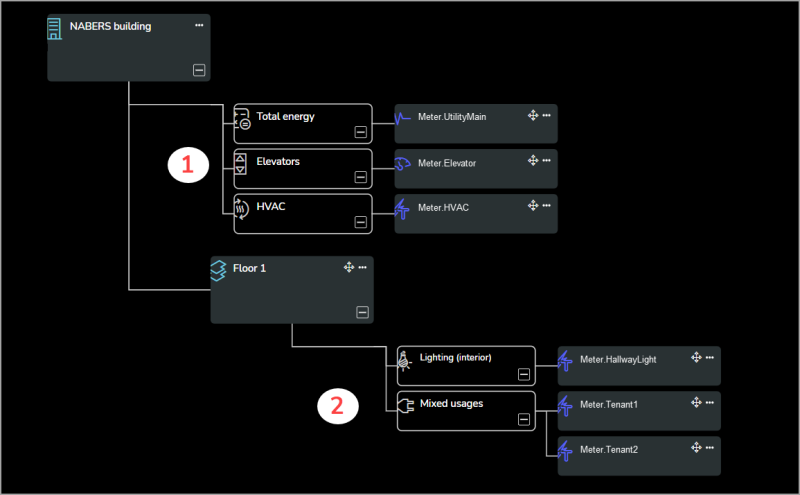
The following shows two simplified examples of organization models. With the setup in example 1, Energy Hub consumption data cannot be used to generate a NABERS rating. Example 2 shows a setup that makes it possible to use Energy Hub consumption data with NABERS.
Example 1 – Organization model is not set up for use with NABERS

NABERS incompatibility:
1 – Central building services are assigned to the building location and not to separate child locations.
2 – Common areas are combined with tenant spaces and are not assigned to separate child locations.
Example 2 – Organization model is correctly set up for use with NABERS

Configuring organizations
- In Energy Hub, in the application header, in the organization selector, select Create new organization. The Create new organization workflow displays.
- Follow the workflow steps and provide the information to create the new organization.
- In Energy Hub, go to Investigate and select the Asset view or Energy view.
- In the organization tree, select the organization (top node in the tree).
- In the information panel, on the Info tab, from the options menu (three dots), select Edit to open the information panel editor.
- In the information panel editor, edit the organization name and description.
- Select Save.
TIP: You can also edit the profile for an organization in Setup > System setup. In the configuration panel, find the organization tile, and from the options menu (three dots)of the tile select Edit organization.
To switch to a different organization in Energy Hub, go to the organization selector in the application header and select the organization you want to access.
To set the currency for an organization:
- In Energy Hub, go to Setup > Organization settings.
- In Organization settings, in the Country section, select the country for which you want to see the currency. This will auto-select the correct currency for this country based on regional defaults.
To overwrite the default regional settings for currency,
- In Energy Hub, go to Setup > Organization settings.
- In Organization settings, in the Data formats section, clear the Use region specific defaults checkbox.
- In the Currency box, select the currency you would like to use for your organization.
To set the time zone for a site:
You cannot set a time zone for a site explicitly. The time zone that is used for a site is based on the street address for the site in Energy Hub. To find out how to enter a street address, see Entering a street address for a location.
- In Energy Hub, go to Setup > System setup.
- (Optional) In Set up system, drag the Region item onto the organization tile in the configuration panel to add a region.
- Drag the Site item onto an organization or region tile in the configuration panel to add a site. The Create new site dialog displays.
- In Create new site, define a site name, street address, and any other required information.
- Select Save.
- In Energy Hub, go to Setup > System setup.
- In the organization model in the configuration panel, find the site you want to configure and select Configure site. The Configure site screen displays.
NOTE: If there are no sites defined yet in the organization diagram, then add sites first. See Adding regions and sites for details.
- In Configure site, in the Asset view or Energy view, drag relevant items onto the organization model in the configuration panel. For example, drag a Floor item onto a Building item.
- Define the item details in the Create new <item> dialog that is displayed each time an item is dragged onto the organization model.
- In Energy Hub, go to Investigate and select the Asset view or Energy view.
- In the organization tree, select the location that you want to enter a street address for.
NOTE: You can enter an address for a site or a building, not for an organization, region, or location within a building.
- In the information panel, on the Info tab, from the options menu (three dots), select Edit to open the information panel editor
- In the information panel editor, under Location, find the Address line box and enter the street address for this location.
NOTE: The default address for locations within a site is the site address. You can change this default by entering a new address for a location.
- Select Save.
NOTE: Buildings are top-level locations of a site and cannot be moved.
- In Energy Hub, go to Setup > System setup.
- In the organization model in the configuration panel, find the site where you want to move the item.
- Select Configure site. The Configure site screen displays.
- In the Asset view, find the item that you want to move.
- From the options menu (three dots) for the item, select Move. The Move <item type> dialog displays.
- In Move <item type>, select a new parent for the item you want to move.
TIP: You can also move items by dragging them by the 4-way arrow icon
 .
. - Select Move to move the item.
- In Energy Hub, go to Setup > System setup.
-
- (For a region or site) In the organization model in the configuration panel, find the region or site that you want to delete.
- (For locations within a site) Find the site with the location you want to delete.
Select Configure site. The Configure site screen displays.
In the Asset view, find the location that you want to delete.
- From the options menu (three dots) for the item, select Delete <item type> to delete the item.
For details on what happens when you delete items, see When deleting items in Energy Hub....