Energy Code Compliance
NOTE: The functionality displayed in this topic might not be the same as what you see for your organization. Your Energy Hub feature plan subscription determines which functions and features are available for your organization. For feature plan details, see Feature plans.
| Overview |
| Functionality |
| Configuring Energy Code Compliance |
| Viewing Energy Code Compliance information |
Use Energy Code Compliance to monitor the energy consumption and cost of your facilities and processes, and gain insight into the energy profile of your organization. Track your energy consumption and cost overall and categorized by usage type, such as lighting, air conditioning, or plug loads. Receive energy management related alarms.
The features and data provided by this module align with important energy efficiency codes and standards, such as ASHRAE![]() American Society of Heating, Refrigerating and Air-Conditioning Engineers or LEED
American Society of Heating, Refrigerating and Air-Conditioning Engineers or LEED![]() Leadership in Energy and Environmental Design. See the full list of supported standards for more information.
Leadership in Energy and Environmental Design. See the full list of supported standards for more information.
Energy Code Compliance can be an important tool to help you meet the energy efficiency goals of your organization. Use it to help you operate your facilities within the expected performance limits set out by your energy efficiency codes and standards.
Energy Code Compliance supported standards
Energy Code Compliance is aligned with the following energy efficiency codes and standards:
| Standard | Description |
|---|---|
|
ASHRAE Standard 90.1 |
ANSI/ASHRAE/IES Standard 90.1: Energy Standard for Buildings Except Low-Rise Residential Buildings provides minimum requirements for energy efficient designs for buildings. |
|
California Energy Code (Title 24) |
Title 24 is a collection of energy standards for California buildings. Its goal is to promote energy efficiency in new and existing buildings. |
|
International Energy Conservation Code (IECC) |
The IECC is a building code created by the International Code Council. It is a model code for the establishment of minimum design and construction requirements for energy efficiency. |
|
LEED v4 |
Leadership in Energy and Environmental Design (LEED) is a green building certification program used worldwide. LEED was developed by the non-profit United States Green Building Council. NOTE: Energy Hub does not report the total building power factor, which is part of LEED. |
|
NEC Article 220.12 |
Article 220.12 is a table in the United States National Electrical Code that is focused on lighting loads. NOTE: Energy Hub does not send notifications for exceeding lighting demand based on illuminated floor area, which is part of NEC 220.12. |
|
NABERS Energy - Office buildings and tenancies |
NABERS (National Australian Built Environment Rating System) is an initiative by the government of Australia to measure and compare the environmental performance of Australian buildings and tenancies. NOTE: The NABERS rating functionality in Energy Hub is only available to users in Australia. |
Energy Code Compliance supported usage types
Supported energy usage types by standards:
| Standard | Usage types |
|---|---|
|
ASHRAE Standard 90.1 |
Load: Supply: |
|
California Energy Code (Title 24) |
Load: Supply: |
|
International Energy Conservation Code (IECC) |
Load: Supply: |
|
LEED v4 |
Load: Supply: |
|
NEC Article 220.12 |
Load: Supply: |
|
Other |
Load: Supply: |
The following describes the main concepts and functions in Energy Code Compliance:
Energy Hub displays consumption of energy, water, and fuel gas. You can view consumption trends and totals for different date ranges, for a site, a building, or other locations selected in the organization tree.
Consumption includes the monitoring of heat energy. Heat energy monitoring tracks the energy of hot water heating systems in your facility. You can view heat power and heat energy totals and trends. Heat energy and heat power are calculated and displayed in kWh and kW and are based on kWh pulse counts from water heat monitoring devices.
NOTE: You cannot set software alarms for heat energy and heat power.
Energy Hub shows cost for electrical energy, water, and fuel gas consumption based on configurable tariffs. You can view cost for different sites and different time ranges. Different sites in the organization can use different tariffs. The same currency is used for all sites.
NOTE: This provides cost estimates for energy and commodity consumption. It does not represent the actual costs charged by your power and commodity suppliers.
Cost details
Depending on the types of consumption you are monitoring and the presence of on-site generation, Energy Hub can show the following cost information:
Summary
Total cost
This includes the cost of electricity, water, and gas. It is an estimate of the cost you have to pay to your electricity and commodity suppliers.
Local generation savings
The amount of money saved by using locally generated electricity. This amount would have been added to your total cost if you did not have on-site generation.
Grid sell-back credits
The amount of money or credits earned by selling locally generated electricity to your electricity provider.
NOTE: Sell-back credit calculations are based on the Electricity sell-back rate setting in the information panel for a site, not on the tariff assigned to the site.
Electricity
Total cost
The cost for your electricity consumption.
Local generation savings
The amount of money saved by using locally generated electricity.
Grid sell-back credits
The amount of money or credits earned by selling locally generated electricity to your electricity provider.
NOTE: Sell-back credit calculations are based on the Electricity sell-back rate setting in the information panel for a site, not on the tariff assigned to the site.
Cost per time-of-use period
The cost for your electricity consumption allocated to time-of-use periods, for example, on-peak cost and off-peak cost
Water
Total cost
The cost for your water consumption.
Gas
Total cost
The cost for your fuel gas consumption.
Tariffs
A tariff is the pricing structure used to bill customers for the consumption of electricity, water, or gas. In Energy Hub, tariffs are used to estimate the cost of electricity, water, and gas consumption for your facility. The following applies to tariffs in Energy Hub:
- A tariff is defined at the organization level and is not site specific.
- A tariff is assigned to a site.
- A tariff has an effective date that sets the start date from when the tariff is active.
- More than one tariff can be assigned to a site for different date ranges.
- The same tariff can be used for more than one site.
- Energy Hub supports flat-rate tariffs and time-of-use tariffs.
A flat-rate tariff is a single-rate tariff that applies to all days and times in the rate period. Flat-rate tariffs have the following parameters:
- Commodity
- Unit
- Rates
Commodity
The commodity shows if the tariff is used for electricity, water, or gas. A tariff can only be used for one commodity.
Unit
The unit shows the consumption measurement that is used for the tariff, for example m3 for water and gas. For electricity tariffs you can choose between active energy (kWh) and apparent energy (kVAh).
IMPORTANT: When selecting an electricity tariff for a site, verify that the unit (energy type) of the tariff matches the energy type used by the site.
Rates
A rate determines the cost of the commodity per unit of consumption. For example, for electricity, a rate could be 0.25 $/kWh.
A time-of-use tariff is a variable rate tariff that is based on the day and the time of consumption. Time-of-use tariffs have the following parameters:
- Commodity
- Unit
- Time-of-use seasons
- Time-of-use periods
- Special days
- Rates
Commodity
The commodity shows if the tariff is used for electricity, water, or gas. A tariff can only be used for one commodity.
Unit
The unit shows the consumption measurement that is used for the tariff, for example m3 for water and gas. For electricity tariffs you can choose between active energy (kWh) and apparent energy (kVAh).
IMPORTANT: When selecting an electricity tariff for a site, verify that the unit (energy type) of the tariff matches the energy type used by the site.
Time-of-use seasons
A time-of-use season defines a date range. For example, a Spring season could have a date range of March 1 – May 31. Seasons are used to define rates for specific date ranges. A tariff can have one or more seasons.
Time-of-use periods
A time-of-use period defines time-of-day ranges for one or more days of the week or special days. For example, an On-peak period could be defined as 16:00–21:00 on Monday–Friday. Periods are used to define rates for specific days of the week and times of the day. A tariff can have one or more periods.
Special days
A special day defines a particular day of the year. For example, a New Year's Day special day could be defined as January 1, 2025. Special days are used to define rates for specific days of the year. Defining special days for a tariff is optional. A tariff can have zero or more special days.
NOTE: Special days are defined for a particular year, for example, a New Year's Day special day for 2025 is only valid in that year. To use the same day in a different year, for example in 2026, you need to define a new special day for the new year's day in 2026.
Rates
A rate determines the cost of the commodity per unit of consumption for a certain day and time. For example, for electricity, a rate could be defined as 0.25 $/kWh for the Spring season On-peak period. A tariff can have one or more rates for different seasons and periods.
Compare energy and commodity (water, fuel gas) consumption over time or for different locations or equipment. You can compare totals and trends for consumption, generation, intensity, and demand.
NOTE: You can do a maximum of 10 comparisons at one time.
Comparison over time
Compare energy and commodity consumption for a location or a piece of equipment for different time periods. You select the reference time period with the date range selector in the Investigate toolbar. The comparison time periods are selected with the time period selector in the header of the Investigate display panel. For details on the comparison time period selector, see Comparison time selector.
Comparison between locations or equipment
Compare energy and commodity consumption for different locations or equipment for a given time period. You select the time period with the date range selector in the Investigate toolbar. The locations or equipment to compare are selected from the organization tree in the navigation panel. You can only compare items of the same type, for example, sites with sites, buildings with buildings, panels with panels.
Energy Hub categorizes energy consumption and supply by energy usage types. For example, heating and lighting are common energy consumption usage types. Total energy is an example for a supply usage type in Energy Hub. Consumption without a usage type is shown as Uncategorized.
TIP: For a list of all supported energy usage types in Energy Hub, see Supported standards .
Energy Hub uses the Total energy usage type to identify incoming feeders that supply energy to panels, buildings, or sites. You assign this usage type in the same way you assign a consumption usage type.
Rules for determining total consumption for a location:
If no monitoring device has been assigned to Total energy for the location, then Energy Hub adds up all the consumption usages for the location to calculate the total.
If at least one monitoring device has been assigned to Total energy for the location, then Energy Hub uses the Total energy to determine the total consumption for this location.
NOTE: The total consumption for a parent location, for example a building, is the sum of the totals of its children, for example floors, plus any usage directly linked to the parent, for example a parking lot.
Example 1: Total consumption calculated based on consumption usages.
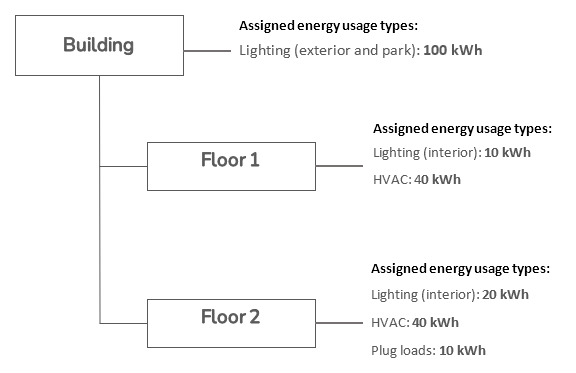
Energy Hub displays the following energy usages for the example above:
| Usage type | Floor 1 | Floor 2 | Building |
|---|---|---|---|
| Total energy consumption | 50 kWh (Lighting + HVAC) | 70 kWh (Lighting + HVAC + Plug loads) | 220 kWh (Floor 1 + Floor 2 + Building Lighting) |
| Lighting (exterior and park) | N/A | N/A | 100 kWh (Building) |
| Lighting (interior) | 10 kWh | 20 kWh | 30 kWh (Floor 1 + Floor 2) |
| HVAC | 40 kWh | 40 kWh | 80 kWh (Floor 1 + Floor 2) |
| Plug loads | N/A | 10 kWh | 10 kWh (Floor 2) |
Example 2: Total consumption determined based on Total energy.
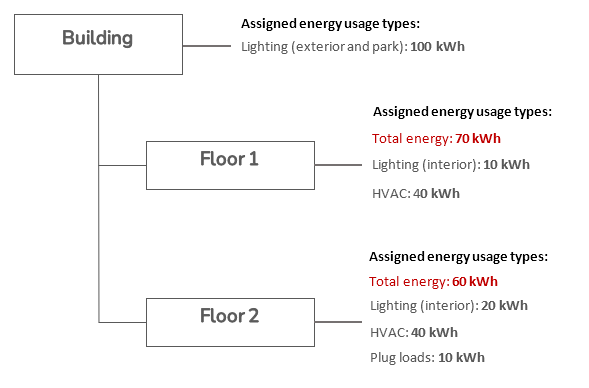
Energy Hub displays the following energy usages for the example above:
| Usage type | Floor 1 | Floor 2 | Building |
|---|---|---|---|
| Total energy consumption | 70 kWh (Total energy) | 60 kWh (Total energy) | 230 kWh (Floor 1 + Floor 2 + Building lighting) |
| Lighting (exterior and park) | N/A | N/A | 100 kWh (Building) |
| Lighting (interior) | 10 kWh | 20 kWh | 30 kWh (Floor 1 + Floor 2) |
| HVAC | 40 kWh | 40 kWh | 80 kWh (Floor 1 + Floor 2) |
| Plug loads | N/A | 10 kWh | 10 kWh (Floor 2) |
| Uncategorized | 20 kWh (Floor 1 total - Lighting - HVAC) | - 10 kWh (Floor 2 total - Lighting - HVAC - Plug loads) | 10 kWh (Building total - Lighting (exterior) - Lighting (interior) - HVAC - Plug loads) |
Uncategorized usage is the delta between the total consumption for a location and the sum of its consumption usages. This Uncategorized usage is the energy or demand that is unaccounted for in Energy Hub. If the total consumption for a location is the same as the sum of its usages, then everything is accounted for and no Uncategorized usage is shown.
Uncategorized usage = Total consumption - sum of consumption usages
NOTE: Uncategorized usage is always zero when the total consumption is calculated based on consumption usages. However, in that case the Uncategorized usage cannot be used to identify usages that are unaccounted for in Energy Hub. For more information on the Total energy usage type, see 'Total energy' usage type.
Scenarios for seeing 'Uncategorized' usage:
Scenario 1:
The total consumption for a location is greater than the sum of its usages. Energy Hub shows a positive Uncategorized usage that matches the difference in consumption between the total and the sum of the usages.
This happens when:
- Some usages have not been assigned energy usage types in Energy Hub, or
- Some usages are not monitored, or
- The monitoring devices for some usages do not provide the required energy data (for example kVAh, if Energy mode is set to Apparent energy).
To remove the display of Uncategorized usage:
- Verify that all usages are assigned to an energy usage type for the location.
- Add monitoring devices to your facility for unmonitored usages, or add a virtual device to the panel for this location in Energy Hub and define its energy usage type.
NOTE: Since you can only add one virtual device per panel, the new virtual device represents the sum of all unmonitored usages for this panel.
- Replace the monitoring devices that do not provide the required data with types that do provide it.
Scenario 2:
The total consumption for a location is less than the sum of its usages. Energy Hub shows a negative Uncategorized usage that matches the difference in consumption between the total and the sum of the usages.
This happens when:
- Some energy supplies (incomers) have not been assigned to the Total energy usage type in Energy Hub, or
- Some energy supplies (incomers) are not monitored, or
- The monitoring devices for some energy supplies (incomers) do not provide the required energy data (for example kVAh, if Energy mode is set to Apparent energy).
To remove the display of Uncategorized usage:
- Verify that all energy supplies (incomers) are assigned to the Total energy usage type for the location.
- Add monitoring devices to your facility for unmonitored energy supplies (incomers), or remove all energy supplies (incomers) from the Total energy usage type for this location.
NOTE: Removing all energy supplies (incomers) from the Total energy usage type will cause Energy Hub to calculate the total consumption based on the sum of all the assigned usages, which will remove the display of Uncategorized usage. For more information on the Total energy usage type, see 'Total energy' usage type.
- Replace the monitoring devices that do not provide the required data with types that do provide it.
Example: Scenario 1, positive Uncategorized usage.

Energy Hub displays the following Uncategorized usages for the example above:
| Floor 1 - Uncategorized usage | Floor 2 - Uncategorized usage | Building - Uncategorized usage |
|---|---|---|
|
20 kWh = Floor 1 Total energy − Lighting − HVAC [(70 −10 − 40) kWh = 20 kWh] |
− 10 kWh = Floor 2 Total energy − Lighting − HVAC − Plug loads [(60 − 20 − 40 − 10) kWh = − 10 kWh] |
10 kWh = Building total − Lighting (exterior) − Lighting (interior) − HVAC − Plug loads [(230 − 100 − 30 − 80 − 10) kWh = 10 kWh] |
For more information on energy usage types in Energy Hub, see Loads, supplies, energy usage types.
Energy Hub displays intensity for energy and water consumption. Intensity is consumption normalized by the floor area for a location, such as a building. It is calculated by dividing the total energy or water consumed for the space by its floor area. You can view intensity trends and totals for different date ranges.
To calculate intensity, Energy Hub needs to know the floor area for the selected location or its child locations.
NOTE: The floor area unit of measurement (ft2 or m2) is determined by the organization settings.
The floor area settings work like this:
Energy Hub uses the floor area that is set in the information panel for a location (organization, region, site, building, ...). If no floor area is set in the information panel, Energy Hub uses the aggregate floor area of the location's direct child locations. Energy Hub only uses this aggregate if all direct child locations have a defined floor area, or if the floor area for these child locations can be calculated by aggregating their children.
Energy Hub does not display the aggregate child floor area value that is used by a parent in the parent information panel.
A manually entered Floor area value in the parent information panel overrides the aggregate of the child locations. Energy Hub does not add the child aggregate to the manually entered floor area for the parent.
Example: Floor area settings (in information panel) and roll-up aggregation.
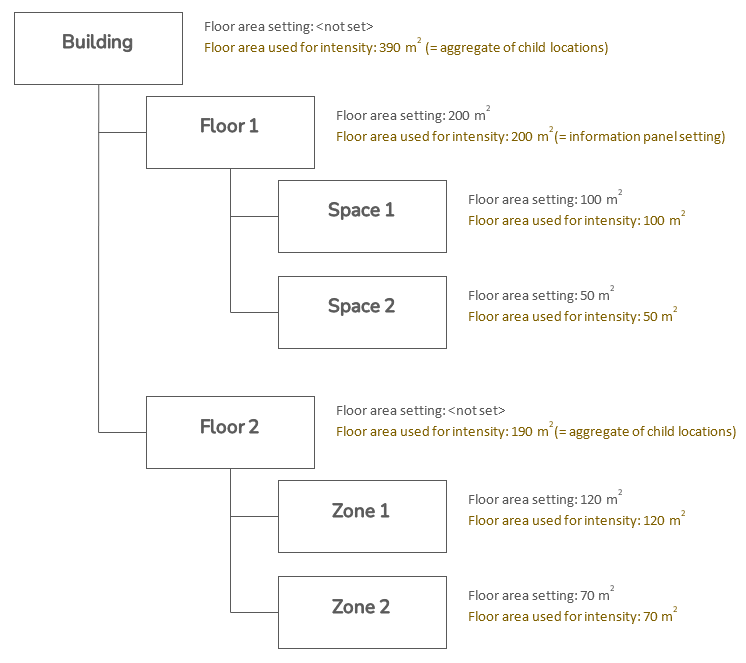
Energy Hub displays electrical demand and peak demand. You can view demand and peak demand trends for your facility for different date ranges. For peak demands, you can view the contributing coincident demands for the different energy usages. You need to configure energy usage types in Energy Hub to see demand.
Energy Code Compliance supports the following alarm types:
Device-based alarms (generated by monitoring devices or communication gateways)
- Energy management alarms (water, air, gas, steam, electricity, demand, power factor)
- General alarms (miscellaneous events, device settings changes, time synchronization, and custom setpoint alarms)
Software alarms (generated by Energy Hub)
Energy consumption alarm
| Property | Value / Description |
|---|---|
|
Category |
Energy Management |
|
Type |
Software alarm |
|
Measurement |
Active energy |
|
Application |
Sites, buildings, panelboards, equipment, electrical devices, power meters, branch circuit monitors |
|
Direction |
Over (alarm goes active when the measurement > ON threshold; alarm goes inactive when the measurement ≤ ON threshold) |
|
Priority (configurable) |
High, medium, or low |
|
Observation period (configurable) |
Interval / Daily |
|
Evaluation period |
Hourly |
|
Trigger |
The alarm goes active when the energy consumption during the observation period is greater than the alarm threshold value. NOTE: Energy Hub uses the total consumption for a location. For example, for a location with multiple electricity meters, the electric energy consumption alarm uses the sum of all the meters. |
|
Configurable |
Yes |
|
Notification can be turned off |
Yes |
For more information on alarms in Energy Hub and how to set up software alarms, see Alarming.
Water consumption alarm
| Property | Value / Description |
|---|---|
|
Category |
Energy Management |
|
Type |
Software alarm |
|
Measurement |
Water volume |
|
Application |
Sites, buildings, water meters |
|
Direction |
Over (alarm goes active when the measurement > ON threshold; alarm goes inactive when the measurement ≤ ON threshold) |
|
Priority (configurable) |
High, medium, or low |
|
Observation period (configurable) |
Daily |
|
Evaluation period |
Hourly |
|
Trigger |
The alarm goes active when the water consumption during the observation period is greater than the alarm threshold value. NOTE: Energy Hub uses the total consumption for a location. For example, for a location with multiple water meters, the water consumption alarm uses the sum of all the meters. |
|
Configurable |
Yes |
|
Notification can be turned off |
Yes |
For more information on alarms in Energy Hub and how to set up software alarms, see Alarming.
Gas consumption alarm
| Property | Value / Description |
|---|---|
|
Category |
Energy Management |
|
Type |
Software alarm |
|
Measurement |
Fuel gas volume |
|
Application |
Sites, buildings, gas meters |
|
Direction |
Over (alarm goes active when the measurement > ON threshold; alarm goes inactive when the measurement ≤ ON threshold) |
|
Priority (configurable) |
High, medium, or low |
|
Observation period (configurable) |
Daily |
|
Evaluation period |
Hourly |
|
Trigger |
The alarm goes active when the fuel gas consumption during the observation period is greater than the alarm threshold value. NOTE: Energy Hub uses the total consumption for a location. For example, for a location with multiple gas meters, the gas consumption alarm uses the sum of all the meters. |
|
Configurable |
Yes |
|
Notification can be turned off |
Yes |
For more information on alarms in Energy Hub and how to set up software alarms, see Alarming.
On-site generation monitoring
Energy Hub supports energy systems with on-site generation. On-site generation is the local production of electricity at your facility to offset utility provided grid power. On-site generation can include renewable energy sources such as solar power, and it can include conventional sources like diesel and gas-powered generation.
Key point: With on-site generation, utility power and locally generated power are used together at the same time.
For systems with on-site generation, Energy Hub displays consumption and cost information on local production, local consumption, and sell back of excess energy to the utility grid.
Where some or all of the on-site generated energy is consumed locally, Energy Hub uses an adjusted electricity rate for calculating energy costs. The adjusted rate is a reduced utility rate that accounts for the cost savings from local generation.
NOTE: Energy Hub only supports on-site generation that is connected to a main incoming feeder at a building or site level. Connections at downstream locations, such as at a floor-level panelboard, are not supported.
The following diagram illustrates the supported connection type for on-site generation for a building:
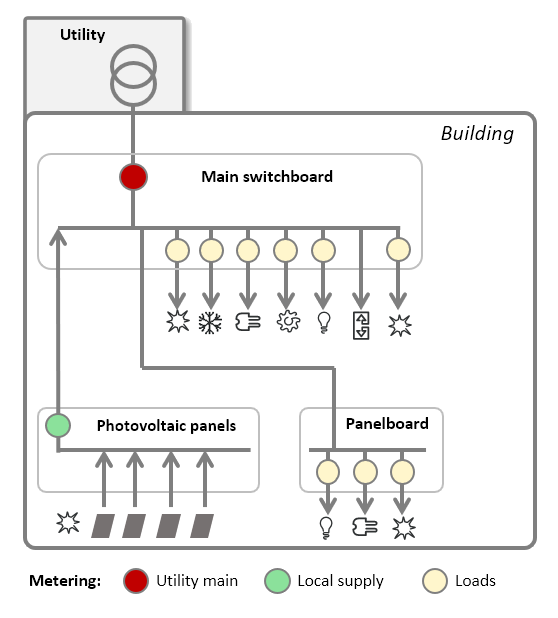
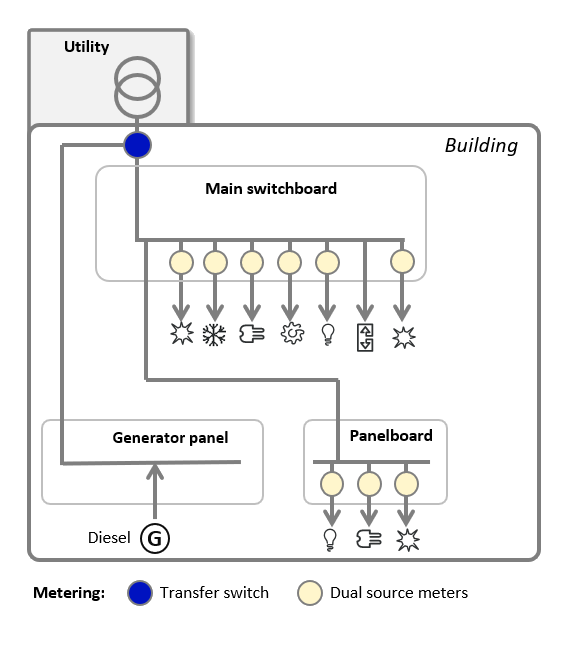
Energy Hub supports installations using Conzerv EM6438H and EasyLogic PM1130H meters with dual-source monitoring capability for energy systems that alternate between two different energy supply sources. Typically, this involves the use of utility power and on-site diesel generation. Dual-source monitoring is used for loads that are downstream from the utility feed and local generation. It is not used for monitoring the utility feed or local generation itself.
Key point: Dual-source systems either use utility power or locally generated power at any point in time, but not both at the same time.
For systems with dual-source energy supplies, Energy Hub displays the energy consumed by a load from each of the supply sources separately.
The following diagram illustrates the supported type of dual-source monitoring:
NOTE: The NABERS rating functionality in Energy Hub is only available to users in Australia.
NABERS (National Australian Built Environment Rating System) is an initiative by the government of Australia to measure and compare the environmental performance of Australian buildings and tenancies. It uses a star rating system to rate the building performance similar to the energy efficiency ratings for home appliances.
Star rating system:
| Star rating | Building performance |
|---|---|
|
|
Making a start |
|
|
Below average |
|
|
Average |
|
|
Good |
|
|
Excellent |
|
|
Market leading |
NABERS can provide energy, water, waste, and indoor environment ratings for offices, hotels, data centers, and other building types.
NOTE: Energy Hub only supports the NABERS energy for office buildings rating system.
For more information on the NABERS rating system, visit the NABERS website.
NABERS in Energy Hub
Energy Hub supports the NABERS energy for office buildings rating system. The ratings generated by Energy Hub are estimates that are based on the NABERS assessment standards. These estimates are not official ratings.
Use Energy Hub NABERS rating estimates to gain an understanding of the energy performance of your buildings and how they might rank on the NABERS star rating system. Receiving an official NABERS rating requires an assessment by an accredited assessor and certification by the National Administrator, which is not within the scope of the NABERS functionality provided in Energy Hub.
For detailed information on the rating inputs, such as rated area or rated hours, see the NABERS Energy and Water for Offices Rules on the NABERS website.
NABERS rating scope
NABERS energy for office buildings defines the following rating scopes to specify the building spaces that are included in a rating:
| Base building | – Includes central building services, such as heating, cooling, and common areas. |
| Whole building | – Includes the entire building, meaning central services, common areas, and tenant spaces. |
| Tenancy | – Includes the office tenant spaces. |
NABERS rating period
The NABERS rating period is one year. You can set the rating period when you create a new NABERS rating or when you edit an existing rating. All you need to enter is the rating period end date, and Energy Hub automatically determines the correct start date. The rating period starts at the beginning of the start date day, at midnight, and ends at the end of the end date day, just after midnight.
NABERS star rating
A NABERS rating is a number between - infinity and 6.50, with two decimal places. A NABERS star rating is a rounded NABERS rating between 0 and 6 in 0.5 star increments, except there is no 0.5 star rating.
Rounding rules:
| Rating | Star rating | Example |
|---|---|---|
| - infinity ≤ Rating ≤ 0.50 | 0 | 0.35 → 0 stars |
| 0.51 ≤ Rating ≤ 1.00 | 1 | 0.68 → 1 star |
| 1.01 ≤ Rating ≤ 1.50 | 1.5 | 1.20 → 1.5 stars |
| 1.51 ≤ Rating ≤ 2.00 | 2 | 1.71 → 2 stars |
| x.01 ≤ Rating ≤ x.50 | x.5 | 4.23 → 4.5 stars |
| x.51 ≤ Rating ≤ y.00 | y | 4.60 → 5 stars |
| 6.01 ≤ Rating | 6 | 6.25 → 6 stars |
Energy Hub organization model setup for NABERS
Following certain best practices when setting up your organization model in Energy Hub makes it possible to use Energy Hub consumption data, instead of manually entered data, when creating NABERS ratings.
For information on how to set up the organization model for use with NABERS, see TIP: Organization model setup for NABERS users.
[Context: NABERS , Australian building rating system]
Backfilling of energy consumption data for NABERS
One input for a NABERS building rating is the building's yearly energy consumption. In Energy Hub, you need to manually enter non-electric energy consumption, such as fuel gas or diesel. For electric consumption, you can enter data manually or get the data from Energy Hub. If you use consumption data from Energy Hub and there is missing data at the beginning of the rating period, then Energy Hub backfills the missing data using estimates based on the average daily consumption. It uses the following estimation method: Estimated yearly kWh = (total logged kWh ÷ days of logged data) × days in rating period.
Example (250 days of data and 10,000 kWh logged energy in Energy Hub):
Estimated yearly kWh = (10,000 kWh ÷ 250) × 365 = 40 kWh × 365 = 14,600 kWh
NOTE: The purpose of NABERS data backfilling is to provide consumption estimates for rating periods that start before Energy Hub recorded consumption data for a building. Backfilling only fills data gaps at the beginning of a rating period, it does not fill gaps in the middle or at the end of the period that are caused by data logging issues.
NOTE: A minimum of seven complete (24-hour) days of measured data must be available for Energy Hub to do the backfilling.
Configuring Energy Code Compliance
The following lists prerequisites and configuration tasks for setting up Energy Code Compliance:
Before configuring Energy Code Compliance, verify that:
- You have a subscription to a feature plan that includes Energy Code Compliance.
- Power monitoring devices are installed in your facility to monitor loads such as lighting, air conditioning, plug loads and other consumers.
- (For water and gas monitoring only) Water and gas monitoring devices are installed in your facility.
- (For heat energy monitoring only) Water heat monitoring devices that produce kWh energy pulses are installed in your facility to monitor the hot water heating systems.
- The power monitoring devices are connected to communication gateways, for example Site Server or Panel Server, that are sending measurement data to Energy Hub over the internet.
- The communication gateways have been added to your organization in Energy Hub.
To configure the base functionality for Energy Code Compliance:
- Add loads and supplies to your organization model.
- Assign energy usage types to the loads and supplies.
- Set the currency for energy cost information.
- Set the energy mode to use active energy or apparent energy
- Create tariffs and assign them to sites for calculating energy, water, and gas consumption costs.
- Set the floor area for locations, such as buildings, for calculating energy and water intensity.
- (For water and gas monitoring only) Add water and gas devices to your organization model and assign usage types.
NOTE: For Energy Hub to recognize a device as a water or gas meter, set the correct I/O Contextualization setting and the Commodity setting for the device in the Panel Server gateway. You can also set the Commodity setting in Energy Hub if it is not set correctly by Panel server. See Energy Hub settings (list) for information on the Commodity setting.
- Create alarm rules to monitor and alarm on energy system conditions.
- (For heat energy monitoring only) Set the Commodity setting for the water heat monitoring devices to Water.
NOTE: The Commodity is set automatically, based on the gateway setting, when a device is first added to the system. Verify that it is set to Water for all heat monitoring devices. If it is not set to Water, set it to Water manually in the device settings in Energy Hub.
To add a load or supply and assign energy usage types:
- In Energy Hub, go to Setup > System setup.
- In the organization model in the configuration panel, find the site that you want to add the load or supply to and select Configure site. The Configure site screen displays.
- In Configure site, in the Energy view, under Add loads and supplies, find the device that monitors the load or supply that you want to add.
- If the device has the correct energy usage type assigned to it, drag the device onto the relevant location in the organization model to add it to this location.
TIP: To add multiple devices to the same location, use
Shift+clickorCtrl+clickto select the devices in the list.If the device does not have an energy usage type assigned to it, or if the assigned usage type is incorrect, then:
- Drag the device and hold it over the relevant location in the organization model. The Assign energy usage type dialog displays, showing a list of recently selected usage types..
- Drop the device on the desired usage type in the list. If you do not see the correct usage type in the list, or the list is empty, drop the device on the Assign a different usage type button. The Assign energy usage type dialog displays.
- In Assign energy usage type, find and select the usage type you want, and select Assign.
- In Energy Hub, go to Setup > System setup.
- In the organization model in the configuration panel, find the site with the load or supply that you want to change the energy usage type for and select Configure site. The Configure site screen displays.
- In Configure site, in the Energy view, in the organization model, find the device that monitors the load or supply that you want to change the energy usage type for.
- From the options menu (three dots) for the device, select Change usage type to open the Change energy usage type dialog.
- In Change energy usage type, select the new usage type for the device.
- Select Change.
You can also change the usage type for a device by pointing to the 4-way arrow on the device tile, then dragging the device onto the location it is associated with in the organization model. This opens the Change energy usage type dialog.
To change the usage type for multiple devices at the same time, use Ctrl+click to select them, then drag them by the 4-way arrow onto the associated location.
- In Energy Hub, go to Setup > System setup.
- In the organization model in the configuration panel, find the site with the load or supply that you want to remove and select Configure site. The Configure site screen displays.
- In Configure site, in the Energy view, in the organization model, find the device that monitors the load or supply that you want to remove.
- From the options menu (three dots) for the device, select Remove device to remove the device and unassociate it from the location in the organization model.
NOTE: Removing a load or supply only removes the association of a device with a location. The device will not be deleted from Energy Hub. The device will be marked as Unassociated in the device list. It will keep the last energy usage type that was assigned to it. You can reassign this usage type when you add the device to the organization model again.
TIP: To remove multiple devices, use Ctrl+click to select the devices, then, from the options menu (three dots) of any one of the devices, select Remove selected.
NOTE: The currency is set at the organization level in Energy Hub. Different organizations can have different currencies.
To change the currency for an organization:
- In Energy Hub, go to Setup > Organization settings.
- In Organization settings, in the Country section, select the country for which you want to see the currency. This will auto-select the correct currency for this country based on regional defaults.
To overwrite the default regional settings for currency,
- In Energy Hub, go to Setup > Organization settings.
- In Organization settings, in the Data formats section, clear the Use region specific defaults checkbox.
- In the Currency box, select the currency you would like to use for your organization.
To set the energy mode for a location:
NOTE: An organization has a default energy mode setting. Regions inherit this setting from the organization. Sites inherit the setting from the regions. Manually setting the energy mode for a region or site overrides the inherited setting.
To set the energy mode for a location:
- In Energy Hub, go to Investigate and select the Asset view or Energy view.
- In the organization tree, select the location that you want to configure the energy mode for.
- In the information panel for the location, on the Info tab, from the options menu (three dots), select Edit to open the information panel editor
- In the information panel editor, under Information, find the Energy mode box and select the mode for this location.
- Select Save.
TIP: You can also configure the energy mode for a location in Setup > System setup, in the information panel for the location.
NOTE: Users with limited access permissions within the organization cannot view, create, edit, assign, or delete tariffs.
NOTE: The new tariff will be assigned automatically to the site it is created on. You can later remove it from the site or use it for other sites if needed.
- In Energy Hub, go to Investigate and select any of the views (Asset, Energy, Electrical, or Cost).
- In the organization tree, select the site that you want to create the tariff for.
- In the information panel for the site, select the Tariffs tab. A selector for commodity options (Electricity, Gas, Water) and a list of assigned tariffs for the chosen commodity for this site display.
- Select the commodity that you want to create the tariff for.
- Select Edit
 . The edit controls display.
 - Select Create new tariff. The Create new tariff panel displays.
- In Create new tariff, select the type of tariff you want to create, or select Copy an existing tariff to create a tariff based on an existing one. Select Next.
NOTE: If you create a tariff based on an existing one, the new tariff default settings will be the same as the settings of the existing tariff. You can then edit those settings in the new tariff to make changes.
- For a flat-rate tariff, define the general tariff information and the rate.
For a time-of-use tariff, define the general tariff information, time-of-use seasons, time-of-use periods, (optional) special days, and rates.
For information on the tariff parameters, see Cost. - Select Create to create the new tariff.
NOTE: Users with limited access permissions within the organization cannot view, create, edit, assign, or delete tariffs.
- In Energy Hub, go to Investigate and select any of the views (Asset, Energy, Electrical, or Cost).
- In the organization tree, select the site that you want to choose the tariff for.
- In the information panel for the site, select the Tariffs tab. A selector for commodity options (Electricity, Gas, Water) and a list of assigned tariffs for the chosen commodity for this site display.
- Select the commodity that you want to choose a tariff for.
- Select Edit
 . The edit controls display.
 - Select Assign tariff. A New tariff assignment tile displays.
- In New tariff assignment, select a tariff and the effective date for the tariff. If there are no tariffs available, then create a tariff first. For step-by-step instructions on how to create a tariff, see Creating tariffs.
NOTE: The effective date is the start date of the measurement data to which the tariff is applied. The tariff will be in effect indefinitely, if no later effective date for a different tariff is defined, or the tariff ends when another one comes into effect.
- Click Select.
- (Optional) Select another tariff with a different effective date.
- Select Save.
NOTE: Users with limited access permissions within the organization cannot view, create, edit, assign, or delete tariffs.
- You can change the tariff information but not the tariff type.
- Tariffs are defined at the organization level and are not site specific. If you edit a tariff, the changes will affect all sites the tariff is assigned to.
- In Energy Hub, go to Investigate and select any of the views (Asset, Energy, Electrical, or Cost).
- In the organization tree, select the site that has the tariff assigned to it that you want to edit, or select any site.
- In the information panel for the site, select the Tariffs tab. A selector for commodity options (Electricity, Gas, Water) and a list of assigned tariffs for the chosen commodity for this site display.
- Select the commodity for the tariff that you want to edit.
- Select Edit
 . The edit controls display.
 - Find the tariff you want to edit in the list of assigned tariffs, or select Assign tariff and temporarily assign the tariff to this site. For step-by-step instructions on how to assign a tariff, see Assigning tariffs to a site.
- Select Edit tariff on the tile of the tariff you want to edit. The edit tariff panel displays.
- In the edit tariff panel make the desired changes to the tariff. For information on the tariff parameters, see Cost.
- Select Save.
- If you temporarily assigned the tariff to this site, remove it again. For step-by-step instructions on how to remove a tariff, see Removing tariffs from a site.
- In Energy Hub, go to Investigate and select any of the views (Asset, Energy, Electrical, or Cost).
- In the organization tree, select the site that you want to remove the tariff from.
- In the information panel for the site, select the Tariffs tab. A selector for commodity options (Electricity, Gas, Water) and a list of assigned tariffs for the chosen commodity for this site display.
- Select the commodity that you want to remove a tariff for.
- Select Edit
 . The edit controls display.
 - Find the tariff you want to remove in the list of tariffs.
- Select Remove
 to remove the tariff.
 - Select Save.
NOTE: Users with limited access permissions within the organization cannot view, create, edit, assign, or delete tariffs.
- In Energy Hub, go to Investigate and select any of the views (Asset, Energy, Electrical, or Cost).
- In the organization tree, select any site.
- In the information panel for the site, select the Tariffs tab. A selector for commodity options (Electricity, Gas, Water) and a list of assigned tariffs for the chosen commodity for this site display.
- Select the commodity for the tariff that you want to delete.
- Select Edit
 . The edit controls display.
 - Select Delete tariff. The Delete tariff dialog displays.
- In Delete tariff, select the tariff you want to delete.
- Review the information displayed in the delete dialog.
- Select Delete.
- In Energy Hub, go to Investigate and select the Asset view or Energy view.
- In the organization tree, select the location that you want to configure the floor area for.
- In the information panel for the location, on the Info tab, from the options menu (three dots), select Edit to open the information panel editor
- In the information panel editor, under Information, find the Floor area box and enter the floor area for this location.
NOTE: Enter the value in the unit of measurement shown in the box label (ft2 or m2). The unit of measurement is determined by the organization settings.
- Select Save.
TIP: You can also configure the floor area for a location in Setup > System setup, in the information panel for the location.
To configure water and gas consumption:
- In Energy Hub, go to Setup > System setup.
- In the organization model in the configuration panel, find the site with the water or gas consumption that you want to configure and select Configure site. The Configure site screen displays.
- In Configure site, in Energy view, under Assign energy usage, find the device that monitors the water or gas consumption that you want to configure.
- Drag the device onto the relevant location in the organization model. The Select usage type dialog displays.
- In Select usage type, select the usage type that best describes what the water or gas is used for. For example, for water, this could simply be Water, for gas, it could be Heating.
- Select OK.
- In Energy Hub, go to Investigate and select the Asset view or Energy view.
- In the organization tree, select the location, device, or equipment that you want to create the alarm rule for.
NOTE: Some alarms only apply to certain locations, devices, or equipment. For information on the applicability of alarms, see Energy Hub alarms (list)
- In the information panel for the location, select the Alarm Settings tab. A list of existing alarm rules for this location displays.
- On the alarm settings tab, select Add Alarm Rule. The Create new alarm rule panel displays.
- In Create new alarm rule, in the Alarm Type section, select the type of alarm rule you want to create. Select Next.
- In Create new alarm rule, in the Setpoint section, define parameters such as aggregation interval, alarm priority, and alarm ON threshold value. Select Next.
- In Create new alarm rule, in the General section, define a name for the new alarm rule.
- (Optional) In Create new alarm rule, in the General section, disable the new alarm rule if you do not want it to take effect immediately.
NOTE: You can enable or disable alarm rules at any time on the alarm settings tab in the information panel for the location.
- Select Finish.
- In Energy Hub, go to Investigate and select the Asset view or Energy view.
- In the organization tree, select the location that you want to edit the alarm rule for.
- In the information panel for the location, select the Alarm Settings tab. A list of existing alarm rules for this location displays.
- Find the alarm rule that you want to edit.
- From the options menu (three dots) for the alarm rule, select Edit. The Edit alarm rule panel displays.
- In Edit alarm rule, in the Setpoint section, update the alarm rule with the changes that you want to make.
NOTE: You cannot change the alarm type of an existing alarm rule.
- Select Next to move to the General section.
- (Optional) Update the alarm rule name.
- Select Finish.
- In Energy Hub, go to Investigate and select the Asset view or Energy view.
- In the organization tree, select the location that you want to enable or disable the alarm rule for.
- In the information panel for the location, select the Alarm Settings tab. A list of existing alarm rules for this location displays.
- Find the alarm rule that you want to enable or disable.
- Toggle the slider control for this alarm rule to enable or disable the alarm rule.
TIP: You can also enable or disable an alarm rule when editing the rule or when creating a new rule.
- In Energy Hub, go to Investigate and select the Asset view or Energy view.
- In the organization tree, select the location that you want to delete the alarm rule for.
- In the information panel for the location, select the Alarm Settings tab. A list of existing alarm rules for this location displays.
- Find the alarm rule that you want to delete.
- From the options menu (three dots) for the alarm rule, select Delete.
- In Energy Hub, go to Investigate and select the Asset view or Energy view.
- In the organization tree, select the device that you want to edit the setting for.
- In the information panel for the device, on the Info tab, from the options menu (three dots), select Edit to open the information panel editor.
- In the information panel editor, find the setting that you want to edit and make your changes.
- Select Save.
Prerequisites
Besides the base functionality prerequisites for Energy Code Compliance, the following is required for on-site generation monitoring:
- Bi-directional monitoring devices are used for monitoring the local generation.
- The incoming utility supply and the local generation are connected at the same level of the site or building electrical system (see on-site generation diagram).
- There is no bi-directional power flow on any of the feeders downstream from the utility / local generation connection point.
Configuration
To configure on-site generation monitoring:
- Complete the relevant base functionality configuration for Energy Code Compliance.
- Assign an energy usage type of Total energy to the devices that are monitoring the utility incomers to your site or building.
- Assign a supply energy usage type, such as Renewable power source or Genset, to the devices that are monitoring the local generation.
- (If necessary) Change the Meter wiring is reversed setting for the local generation monitoring devices (see below).
Energy Hub expects a generation monitoring device to be wired as a supply monitoring device. That means the current instrument transformers (CTs) are connected to measure generated energy as delivered (positive) and consumed energy as received (negative).
A correctly wired generation monitoring device will show a large energy generation and only a small energy consumption in Energy Hub. If the device is showing a large energy consumption and a small generation, then the device wiring might be reversed. You can verify this by checking the Energy consumption and generation display for the device in Energy view. To compensate for reverse wiring, set the Meter wiring is reversed setting for the device in Energy Hub to Yes. For more information on reversed meter wiring, see Locally generated energy shown as consumption instead of generation.
- (Optional) Set an electricity sell-back rate if you are selling on-site generated energy back to the utility grid.
To add a load or supply and assign energy usage types:
- In Energy Hub, go to Setup > System setup.
- In the organization model in the configuration panel, find the site that you want to add the load or supply to and select Configure site. The Configure site screen displays.
- In Configure site, in the Energy view, under Add loads and supplies, find the device that monitors the load or supply that you want to add.
- If the device has the correct energy usage type assigned to it, drag the device onto the relevant location in the organization model to add it to this location.
TIP: To add multiple devices to the same location, use
Shift+clickorCtrl+clickto select the devices in the list.If the device does not have an energy usage type assigned to it, or if the assigned usage type is incorrect, then:
- Drag the device and hold it over the relevant location in the organization model. The Assign energy usage type dialog displays, showing a list of recently selected usage types..
- Drop the device on the desired usage type in the list. If you do not see the correct usage type in the list, or the list is empty, drop the device on the Assign a different usage type button. The Assign energy usage type dialog displays.
- In Assign energy usage type, find and select the usage type you want, and select Assign.
- In Energy Hub, go to Investigate and select the Asset view or Energy view.
- In the organization tree, select the device that you want to edit the setting for.
- In the information panel for the device, on the Info tab, from the options menu (three dots), select Edit to open the information panel editor.
- In the information panel editor, find the setting that you want to edit and make your changes.
- Select Save.
NOTE: The electricity sell-back rate is set at the site level in Energy Hub. Different sites can have different electricity sell-back rates.
- In Energy Hub, go to Investigate and select the Asset view or Energy view.
- In the organization tree, select the site that you want to set the electricity sell-back rate for.
- In the information panel for the site, on the Info tab, from the options menu (three dots), select Edit to open the information panel editor.
- In the information panel editor, under Information, find the Electricity sell-back rate box and enter the rate you would like to use for this site.
Example: Enter
0.25for an electricity sell-back rate of 25 cents per kWh (for a currency of United States dollar). - Select Save.
TIP: You can also set the electricity sell-back rate in Setup > System setup, in the information panel for the site.
Prerequisites
Besides the base functionality prerequisites for Energy Code Compliance, the following is required for dual source monitoring:
- Dual-source monitoring devices are used for monitoring the loads in the system.
Configuration
To configure dual source monitoring:
- Complete the relevant base functionality configuration for Energy Code Compliance.
- Set the Dual source meter setting for all dual source monitoring devices in Energy Hub to Yes.
- In Energy Hub, go to Investigate and select the Asset view or Energy view.
- In the organization tree, select the device that you want to edit the setting for.
- In the information panel for the device, on the Info tab, from the options menu (three dots), select Edit to open the information panel editor.
- In the information panel editor, find the setting that you want to edit and make your changes.
- Select Save.
NOTE: The NABERS rating functionality in Energy Hub is only available to users in Australia.
In addition to the base functionality prerequisites for Energy Code Compliance, the following is required for NABERS:
- The country setting for your organization in Energy Hub must be set to Australia.
- The street address for the building you want to create a NABERS rating for must be set to a valid Australian street address in Energy Hub.
Configuration
To configure NABERS:
- Enter a valid Australian street address for the NABERS rating buildings.
- Add buildings from your organization model in Energy Hub to NABERS.
- Create NABERS ratings for the buildings.
- In Energy Hub, go to Investigate and select the Asset view or Energy view.
- In the organization tree, select the location that you want to enter a street address for.
- In the information panel, on the Info tab, from the options menu (three dots), select Edit to open the information panel editor
- In the information panel editor, under Location, find the Address line box and enter the street address for this location.
- Select Save.
NOTE: When you add a building, you need to create a NABERS rating for this building.
- In Energy Hub, go to NABERS.
- In the NABERS ratings manager, in the list panel, select Add new building. The Create a new NABERS rating setup panel displays.
- In the setup panel, on the Building page, select the building that you want to add and to create a rating for.
- Select Next. The Scope and target page displays.
- On the Scope and target page, select the rating scope and (optional) select a target star rating.
- Select Next. The Building details page displays.
- On the Building details page, enter the building related rating inputs.
TIP: To set the Rated area to the floor area that is configured in Energy Hub for this building, select the provided link. This will update the Rated area box with the Energy Hub floor area value.
- Select Next. The Energy use page displays.
- On the Energy use page, set the rating period and enter energy use details.
NOTE: The rating period includes the start and end day of the period.
- Select Create to add the new building and create a rating.
NOTE: This will remove the building from the NABERS building list and delete all the building ratings. It will not delete the building from Energy Hub.
- In Energy Hub, go to NABERS.
- In the NABERS ratings manager, in the list panel, find the building that you want to remove.
- From the options menu (three dots) for the building, select Remove building.
To create a NABERS rating for a new building (not yet in the NABERS building list):
See Adding buildings to NABERS.
To create a completely new NABERS rating for a building in the NABERS building list:
- In Energy Hub, go to NABERS.
- In the NABERS ratings manager, in the list panel, find the building that you want to create a rating for.
- Select the building. The existing ratings for this building display in the building rating results panel.
- In the building rating results panel, select Create new rating. The Create new NABERS rating setup panel displays.
- In the setup panel, on the Building page, select Next to continue with the current building. (Optional) You can select a different building and then select Next. The Scope and target page displays.
- On the Scope and target page, select the rating scope and (optional) select a target star rating.
- Select Next. The Building details page displays.
- On the Building details page, enter the building related rating inputs.
TIP: To set the Rated area to the floor area that is configured in Energy Hub for this building, select the provided link. This will update the Rated area box with the Energy Hub floor area value.
- Select Next. The Energy use page displays.
- On the Energy use page, set the rating period and enter energy use details.
NOTE: The rating period includes the start and end day of the period.
- Select Create.
To create a new NABERS rating based on an existing rating for a building:
- In Energy Hub, go to NABERS.
- In the NABERS ratings manager, in the list panel, find the building that you want to create a rating for.
- Select the building. The existing ratings for this building display in the building rating results panel.
- In the building rating results panel, find the rating that you want to base the new rating on.
- From the options menu (three dots) for the rating, select Copy as new rating. The Copy as new rating setup panel displays.
NOTE: The rating input defaults for the new rating are the same as for the existing rating. You can edit those inputs to fit the new rating that you want to create.
- On the Scope and target tab, adjust the rating scope and target star rating as needed.
- On the Building details tab, adjust the building related rating inputs as needed.
TIP: To set the Rated area to the floor area that is configured in Energy Hub for this building, select the provided link. This will update the Rated area box with the Energy Hub floor area value.
- On the Energy use tab, adjust the rating period and energy use details as needed.
NOTE: The rating period includes the start and end day of the period.
- Select Save to create a new NABERS rating.
- In Energy Hub, go to NABERS.
- In the NABERS ratings manager, in the list panel, find the building that you want to edit rating inputs for.
- Select the building. The ratings for this building display in the building rating results panel.
- In the building rating results panel, find the rating that you want to edit the inputs for.
- From the options menu (three dots) for the rating, select Edit. The Edit NABERS rating panel displays.
- In the edit panel, update the inputs that you want to change.
- Select Save to recalculate the NABERS rating and the rating report with the changed inputs.
- In Energy Hub, go to NABERS.
- In the NABERS ratings manager, in the list panel, find the building that you want to recalculate a rating for.
- Select the building. The ratings for this building display in the building rating results panel.
- In the building rating results panel, find the rating that you want to recalculate.
- From the options menu (three dots) for the rating, select Recalculate to recalculate the rating.
- In Energy Hub, go to NABERS.
- In the NABERS ratings manager, in the list panel, find the building that you want to delete a rating for.
- Select the building. The ratings for this building display in the building rating results panel.
- In the building rating results panel, find the rating that you want to delete.
- From the options menu (three dots) for the rating, select Delete to delete the rating.
Viewing Energy Code Compliance information
The following shows how you can view Energy Code Compliance information in Energy Hub:
NOTE: Always consider the Safety Precautions when using information provided by Energy Hub for decision making.
Before you can view Energy Code Compliance information you need to configure Energy Code Compliance.
- In Energy Hub, go to Investigate and select the Energy view.
- In the organization tree, select the location that you want to see the information for.
- In the display panel, view energy, cost, demand, and commodities information.
TIP: To set the date range for the displayed information, use the date range selector in the Views navigation bar, in Investigate.
NOTE: You can only view cost at the site level.
- In Energy Hub, go to Investigate and select the Cost view.
- In the organization tree, select the site that you want to see the cost for.
- In the display panel, view the cost information.
NOTE: Users with limited access permissions within the organization cannot view, create, edit, assign, or delete tariffs.
- In Energy Hub, go to Investigate and select any of the views (Asset, Energy, Electrical, or Cost.
- In the organization tree, select the site that you want to view the tariffs for.
- In the information panel for the site, select the Tariffs tab. A selector for commodity options (Electricity, Gas, Water) and a list of assigned tariffs for the chosen commodity for this site display.
- Select the commodity that you want to view the tariffs for.
- The list of assigned tariffs for the commodity for the site displays.
- In Energy Hub, go to Investigate and select any of the views (Asset, Energy, Electrical, or Cost).
- In the organization tree, select the site that has the tariff assigned to it that you want to view the details for, or select any site.
- In the information panel for the site, select the Tariffs tab. A selector for commodity options (Electricity, Gas, Water) and a list of assigned tariffs for the chosen commodity for this site display.
- Select the commodity for the tariff that you want to review.
- Select Edit
 . The edit controls display.
 - Find the tariff you want to review in the list of assigned tariffs, or select Assign tariff and temporarily assign the tariff to this site. For step-by-step instructions on how to assign a tariff, see Assigning tariffs to a site.
- Select Edit tariff on the tile of the tariff you want to edit. The edit tariff panel displays.
- In the edit tariff panel review the tariff details.
- Select Cancel to exit the edit tariff panel without saving any changes.
- If you temporarily assigned the tariff to this site, remove it again. For step-by-step instructions on how to remove a tariff, see Removing tariffs from a site.
- Select Cancel again to exit the information panel edit mode .
NOTE: Users with limited access permissions within the organization cannot view, create, edit, assign, or delete tariffs.
- In Energy Hub, go to Investigate and select any of the views (Asset, Energy, Electrical, or Cost).
- In the organization tree, select any site.
- In the information panel for the site, select the Tariffs tab. A selector for commodity options (Electricity, Gas, Water) and a list of assigned tariffs for the chosen commodity for this site display.
- Select the commodity that you want to see the available tariffs for.
- Select Edit
 . The edit controls display.
 - Select Assign tariff. A New tariff assignment tile displays.
- In New tariff assignment, in the Tariff drop-down selector, view the list of tariffs that are available for this commodity for the organization.
- Select Cancel to exit without assigning a tariff.
- Select Cancel again to exit the information panel edit mode .
NOTE: Heat energy and heat power are displayed in Asset view, not Energy view.
- In Energy Hub, go to Investigate and select the Asset view.
- In the organization tree, select the heat monitoring device that you want to see the information for.
- In the display panel, view heat power in the Equipment status display and heat power and energy in the Trends displays.
TIP: To set the date range for the displayed information, use the date range selector in the Investigate toolbar.
- In Energy Hub, go to Investigate and select the Energy view.
- In the organization tree, select the location or equipment that you want to compare.
- In the Investigate toolbar, select the date range for which you want to see energy data. The display panel shows energy information for the selected date range.
- In the header of the display area, from the comparison type selector, select Time period. The Add time period selector displays.
- From the Add time period selector, select a comparison time period to add it to the display.
NOTE: The date range selection in the date range selector in the Investigate toolbar determines which comparison time periods are available in the Add time period selector. For details, see Comparison time selector.
- (Optional) Add additional comparison periods. You can add up to 10 periods.
- View the energy comparisons in the display panel.
NOTE: To turn off comparison, select (No comparison) from the comparison type selector. Your last comparison selections will be preserved until you manually clear them.
- In Energy Hub, go to Investigate and select the Energy view.
- In the organization tree, select the location or equipment that you want to compare.
- In the Investigate toolbar, select the date range for which you want to see energy data. The display panel shows energy information for the selected date range.
- In the header of the display area, from the comparison type selector, select the location or equipment type to compare. The Add <type> control displays.
NOTE: The control gives you the option to compare with the same type of location or equipment that you selected in the organization tree. For example, if you selected a site, the control will say Add site.
- Select Add <type>. The organization tree in the navigation panel highlights compatible locations or equipment.
NOTE: You can only compare items of the same type.
- In the organization tree, select a location or equipment to add it to the display for comparison.
- (Optional) Add additional comparison locations or equipment. You can add up to 10 items.
- View the energy comparisons in the display panel.
NOTE: To turn off comparison, select (No comparison) from the comparison type selector. Your last comparison selections will be preserved until you manually clear them.
- In Energy Hub, go to Investigate and select the Asset view or Energy view.
- In the organization tree, select the location that you want to view existing alarm rules for.
- In the information panel for the location, select the Alarm Settings tab. A list of existing alarm rules for this location displays.
- In Energy Hub, go to Investigate and select the Energy view.
- In the organization tree, select the location that you want to create the report for.
- In the display panel, select the printer icon at the top of the panel. The print preview page opens.
- In Print preview, select the desired print settings.
- Select Save to save the report for a PDF output, or select Print for a print output.
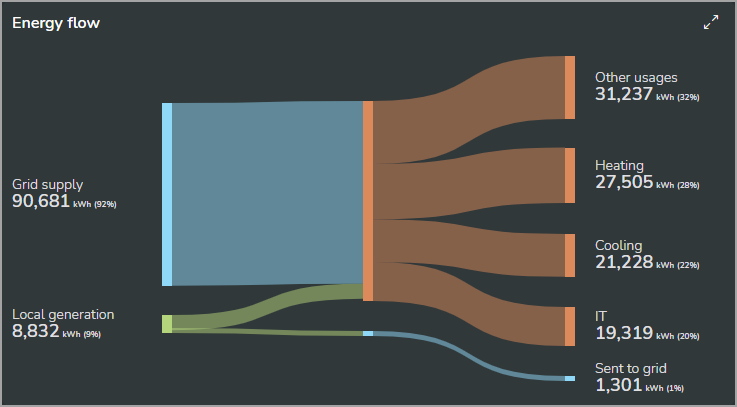
This display shows the energy flow from sources to consumers for your facilities. If there are five or more consumers, the display shows the top three and groups the remaining as Other usages.
NOTE: The display shows active energy (kWh) or apparent energy (kVAh), depending on the Energy mode setting for the selected location.
- Hover the pointer over the display to see related information.
- Select the arrows icon in the top right corner to maximize the display.
Example (shown in dark mode and in English language):
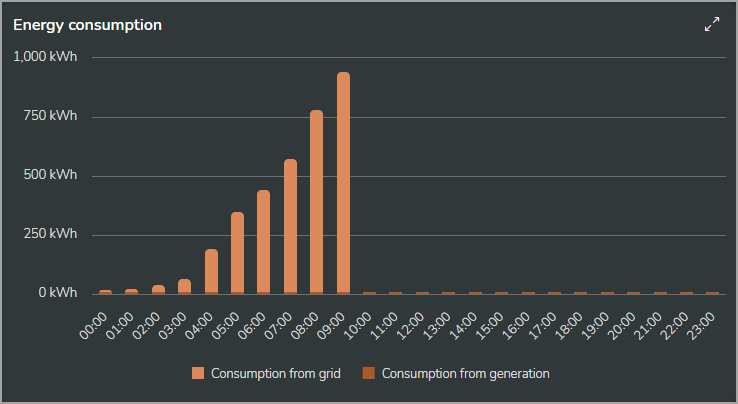
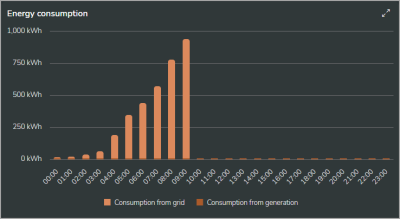
This display shows energy consumption. For locations with on-site generation, the display includes energy generation.
NOTE: The display shows active energy (kWh) or apparent energy (kVAh), depending on the Energy mode setting for the selected location.
- To hide or show a series in the chart, select it in the chart legend.
- Hover the pointer over the display to see related information.
- Drag the pointer over the chart to zoom.
- Select the arrows icon in the top right corner to maximize the display.
Examples (shown in dark mode and in English language):
Location without on-site generation
Location with on-site generation
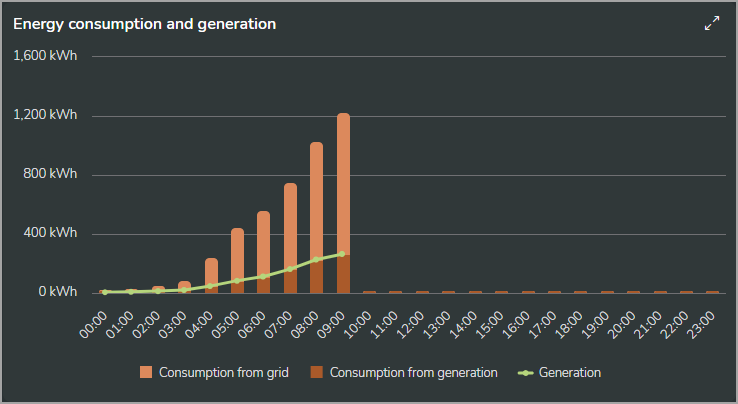
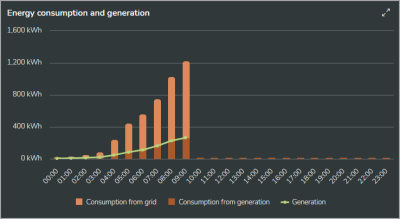
NOTE: The time range for a column in the chart includes the end point and excludes the starting point. For example, in an hourly column chart, a column labeled 08:00 includes measurements taken after 08:00 up to those taken at 09:00.
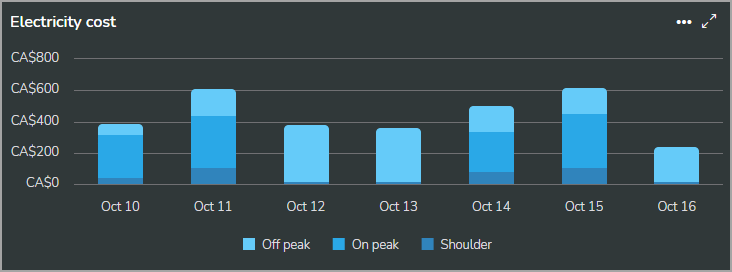
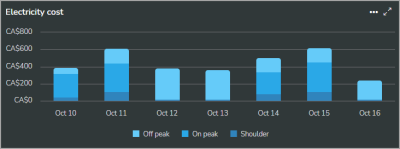
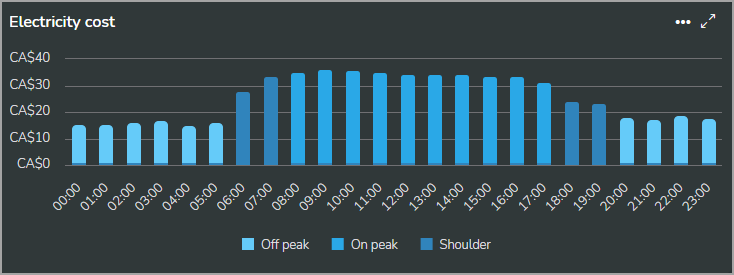
This display shows electric energy cost. For locations with on-site generation, the display includes savings from energy generation.
- Hover the pointer over the display to see related information.
- Select the arrows icon in the top right corner to maximize the display.
Examples
Daily electricity cost for time-of-use tariff (shown in dark mode):
Hourly electricity cost for time-of-use tariff (shown in dark mode):
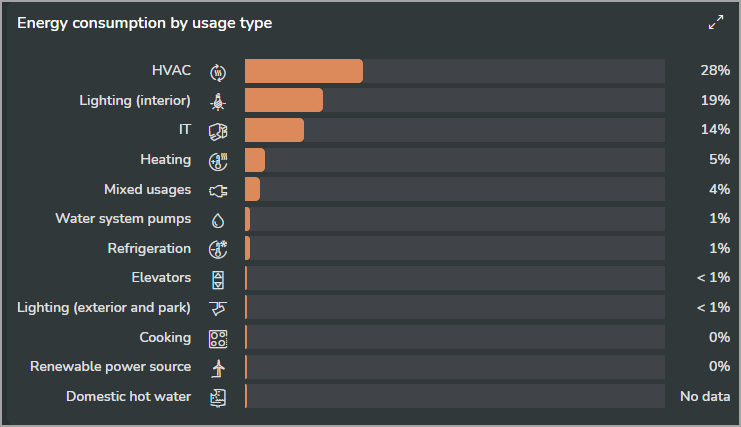
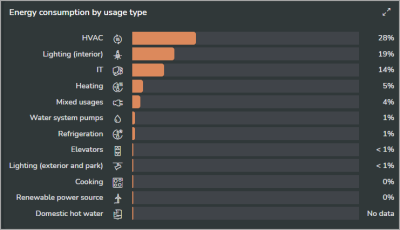
This display shows energy consumption categorized by usage. The chart is ordered by consumption, with the highest consumption at the top.
NOTE: The display shows active energy (kWh) or apparent energy (kVAh), depending on the Energy mode setting for the selected location.
NOTE: The display shows a maximum of 10 usage types.
- Hover the pointer over the display to see related information.
- Select the arrows icon in the top right corner to maximize the display.
Example (shown in dark mode and in English language):
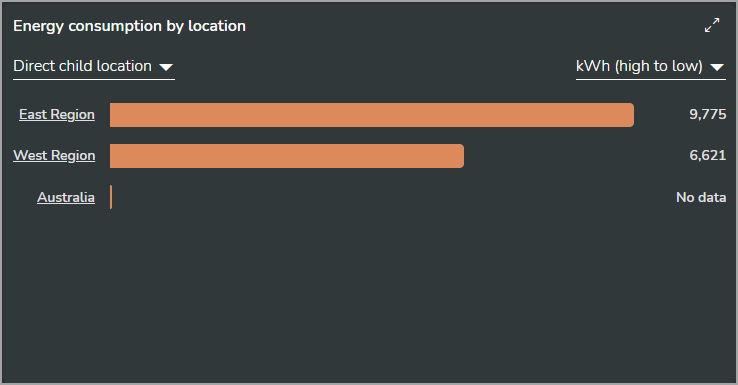
This display shows energy consumption for the child locations of the selected location. You can select the child location type and the ordering of the chart.
NOTE: The display shows active energy (kWh) or apparent energy (kVAh), depending on the Energy mode setting for the selected location.
NOTE: This display shows a maximum of 10 locations.
- Hover the pointer over the display to see related information.
- Select the arrows icon in the top right corner to maximize the display.
Example (shown in dark mode and in English language):
This display shows energy consumption per floor area.
NOTE: The display shows active energy (kWh) or apparent energy (kVAh), depending on the Energy mode setting for the selected location.
- Hover the pointer over the display to see related information.
- Drag the pointer over the chart to zoom.
- Select the arrows icon in the top right corner to maximize the display.
Example (shown in dark mode and in English language):
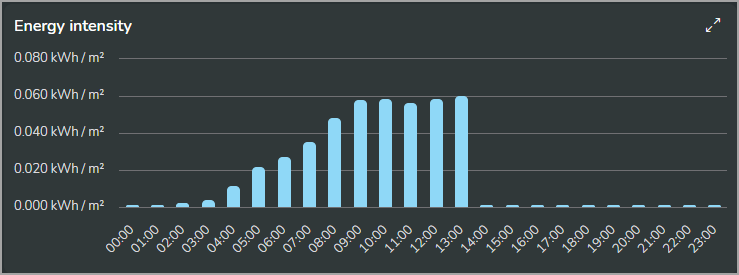
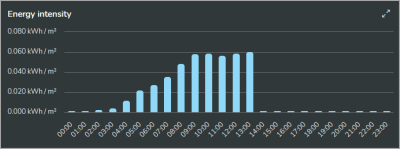
NOTE: The time range for a column in the chart includes the end point and excludes the starting point. For example, in an hourly column chart, a column labeled 08:00 includes measurements taken after 08:00 up to those taken at 09:00.
This display shows energy consumption per floor area for the child locations of the selected location. You can select the child location type and the ordering of the chart.
NOTE: The display shows active energy (kWh) or apparent energy (kVAh), depending on the Energy mode setting for the selected location.
NOTE: This display shows a maximum of 10 locations.
- Hover the pointer over the display to see related information.
- Select the arrows icon in the top right corner to maximize the display.
Example (shown in dark mode and in English language):
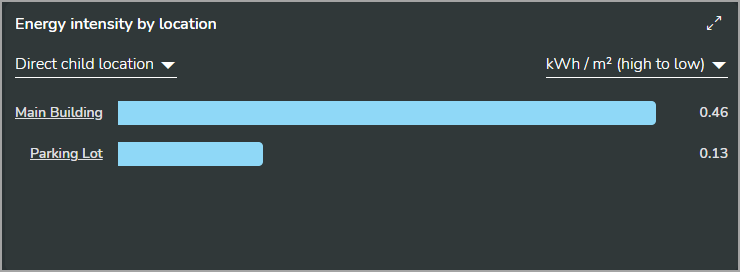
This display shows electric power demand. Each column in the chart shows the peak demand for the corresponding time interval.
NOTE: The display shows active power demand (kW) or apparent power demand (kVA), depending on the Energy mode setting for the selected location.
NOTE: This display shows power data if demand data is not available.
- Hover the pointer over the display to see related information.
- Drag the pointer over the chart to zoom.
- Select the arrows icon in the top right corner to maximize the display.
Example (shown in dark mode and in English language):
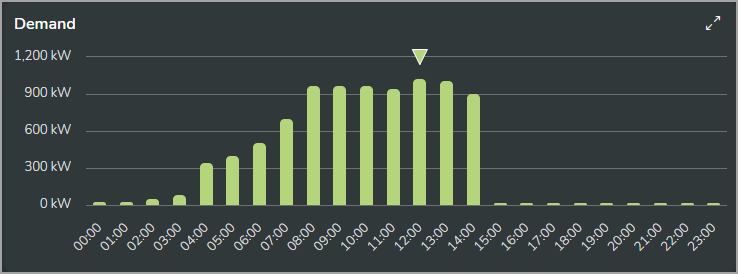
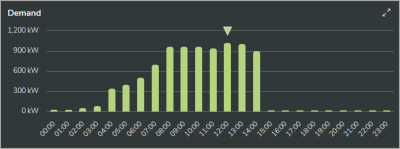
NOTE: The time range for a column in the chart includes the end point and excludes the starting point. For example, in an hourly column chart, a column labeled 08:00 includes measurements taken after 08:00 up to those taken at 09:00.
This display shows water consumption.
- Hover the pointer over the display to see related information.
- Drag the pointer over the chart to zoom.
- Select the arrows icon in the top right corner to maximize the display.
Example (shown in dark mode and in English language):
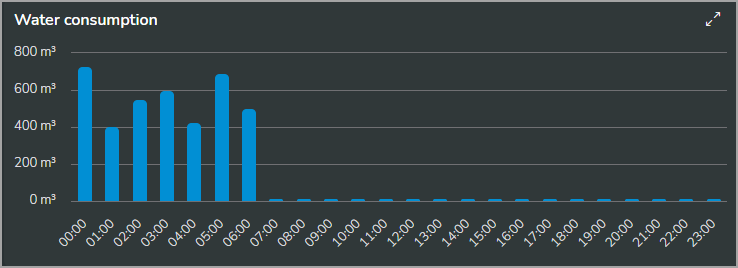
NOTE: The time range for a column in the chart includes the end point and excludes the starting point. For example, in an hourly column chart, a column labeled 08:00 includes measurements taken after 08:00 up to those taken at 09:00.
This display shows water consumption cost. Select the options menu (three dots) to export the display data as CSV file.
NOTE: Water cost is based on water volume, not on water heat energy.
- Hover the pointer over the display to see related information.
- Drag the pointer over the chart to zoom.
- Select the arrows icon in the top right corner to maximize the display.
Example (shown in dark mode and in English language):
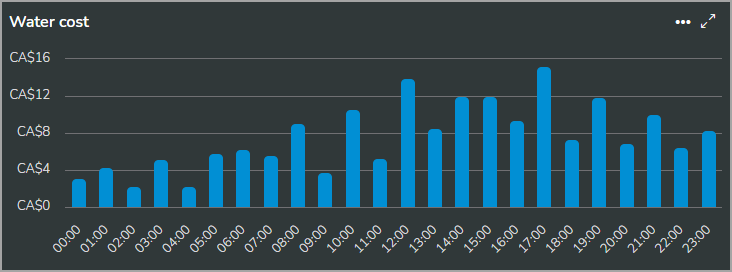
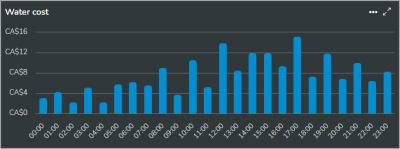
NOTE: The time range for a column in the chart includes the end point and excludes the starting point. For example, in an hourly column chart, a column labeled 08:00 includes measurements taken after 08:00 up to those taken at 09:00.
This display shows water consumption per floor area.
- Hover the pointer over the display to see related information.
- Drag the pointer over the chart to zoom.
- Select the arrows icon in the top right corner to maximize the display.
Example (shown in dark mode and in English language):
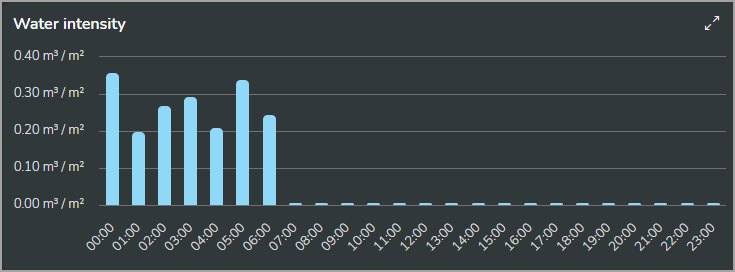
NOTE: The time range for a column in the chart includes the end point and excludes the starting point. For example, in an hourly column chart, a column labeled 08:00 includes measurements taken after 08:00 up to those taken at 09:00.
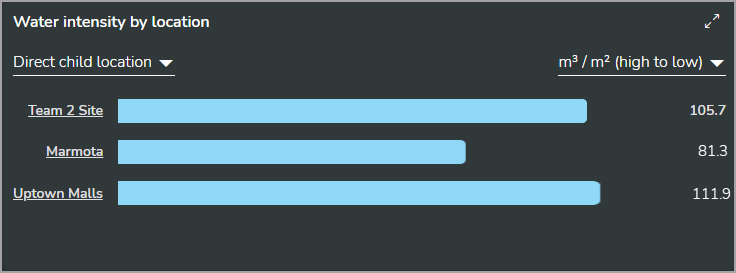
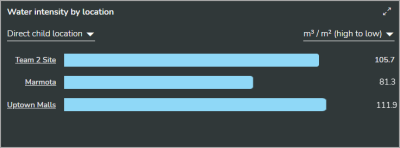
This display shows water consumption per floor area for the child locations of the selected location. You can select the child location type and the ordering of the chart.
NOTE: This display shows a maximum of 10 locations.
- Hover the pointer over the display to see related information.
- Select the arrows icon in the top right corner to maximize the display.
Example (shown in dark mode and in English language):
This display shows fuel gas consumption.
- Hover the pointer over the display to see related information.
- Drag the pointer over the chart to zoom.
- Select the arrows icon in the top right corner to maximize the display.
Example (shown in dark mode and in English language):
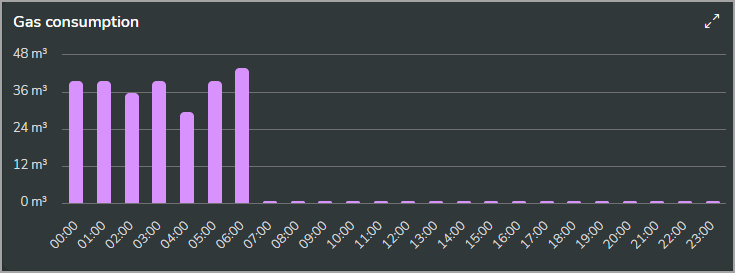
NOTE: The time range for a column in the chart includes the end point and excludes the starting point. For example, in an hourly column chart, a column labeled 08:00 includes measurements taken after 08:00 up to those taken at 09:00.
This display shows fuel gas consumption cost. Select the options menu (three dots) to export the display data as CSV file.
NOTE: Gas cost is based on gas volume, not on gas energy content.
- Hover the pointer over the display to see related information.
- Drag the pointer over the chart to zoom.
- Select the arrows icon in the top right corner to maximize the display.
Example (shown in dark mode and in English language):
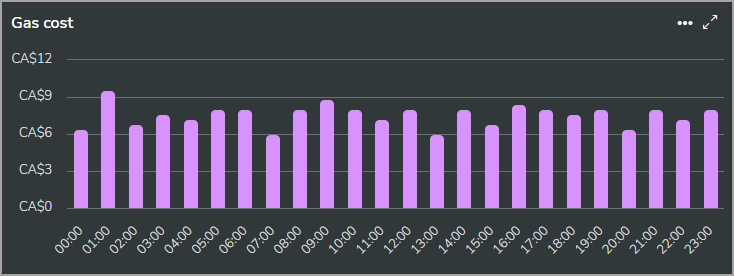
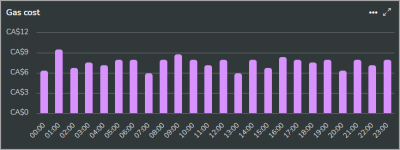
NOTE: The time range for a column in the chart includes the end point and excludes the starting point. For example, in an hourly column chart, a column labeled 08:00 includes measurements taken after 08:00 up to those taken at 09:00.
You can view on-site generation consumption and cost information in Investigate > Energy view and Investigate > Cost view:
This display shows the energy flow from sources to consumers for your facilities. If there are five or more consumers, the display shows the top three and groups the remaining as Other usages.
NOTE: The display shows active energy (kWh) or apparent energy (kVAh), depending on the Energy mode setting for the selected location.
- Hover the pointer over the display to see related information.
- Select the arrows icon in the top right corner to maximize the display.
Example (shown in dark mode and in English language):


This display shows energy consumption. For locations with on-site generation, the display includes energy generation.
NOTE: The display shows active energy (kWh) or apparent energy (kVAh), depending on the Energy mode setting for the selected location.
- To hide or show a series in the chart, select it in the chart legend.
- Hover the pointer over the display to see related information.
- Drag the pointer over the chart to zoom.
- Select the arrows icon in the top right corner to maximize the display.
Examples (shown in dark mode and in English language):
Location without on-site generation


Location with on-site generation


NOTE: The time range for a column in the chart includes the end point and excludes the starting point. For example, in an hourly column chart, a column labeled 08:00 includes measurements taken after 08:00 up to those taken at 09:00.
This display shows electric energy cost. For locations with on-site generation, the display includes savings from energy generation.
- Hover the pointer over the display to see related information.
- Select the arrows icon in the top right corner to maximize the display.
Examples
Daily electricity cost for time-of-use tariff (shown in dark mode):


Hourly electricity cost for time-of-use tariff (shown in dark mode):


You can view dual source consumption information in Investigate > Energy view:
This display shows energy consumption. For locations with on-site generation, the display includes energy generation.
NOTE: The display shows active energy (kWh) or apparent energy (kVAh), depending on the Energy mode setting for the selected location.
- To hide or show a series in the chart, select it in the chart legend.
- Hover the pointer over the display to see related information.
- Drag the pointer over the chart to zoom.
- Select the arrows icon in the top right corner to maximize the display.
Examples (shown in dark mode and in English language):
Location without on-site generation


Location with on-site generation


NOTE: The time range for a column in the chart includes the end point and excludes the starting point. For example, in an hourly column chart, a column labeled 08:00 includes measurements taken after 08:00 up to those taken at 09:00.
NOTE: The NABERS rating functionality in Energy Hub is only available to users in Australia.
You can view NABERS rating information in the NABERS ratings manager, under NABERS in the top navigation.
- In Energy Hub, go to NABERS.
- In the NABERS ratings manager, in the list panel, find the building that you want to view rating details for.
- Select the building. The ratings for this building display in the building rating results panel.
- In the building rating results panel, find the rating that you want to view details for.
- Double-click the rating or select View rating details from the options menu (three dots) for the rating. The rating details display.
TIP: You can also double-click the rating row to open the details.
- In Energy Hub, go to NABERS.
- In the NABERS ratings manager, in the list panel, find the building that you want to download a rating report for.
TIP: If the building does not exist, see Adding buildings to NABERS to learn how to add a building and create a rating.
- Select the building. The ratings for the building display in the building rating results panel.
- In the building rating results panel, find the rating that you want to download a report for.
- In the table row for the rating, select the PDF icon
 in the Report column. The rating report downloads and opens in a new browser window.