System deployment and start-up
| Process |
| Tools |
| Device and application specific configurations |
| Resources |
| Quick start |
Process
To deploy an Energy Hub system:
- Install the meters, sensors, and other devices at the customer site.
- Set up device communication networks.
- Configure devices and communications in the gateway, for example Panel Server.
- Set up internet networks and cloud connections (might include firewall configuration).
- Log in to Energy Hub and activate a feature plan with the required device credits.
- Complete the basic setup (connect to gateways, test device communications, define access permissions, add users).
- Set up the organization model.
Tools
EcoStruxure Power Commission (EPC)
EPC is a tool to set up devices, equipment, and Panel Server gateways. EPC is available as desktop app, web app, and mobile app. For information on EPC and download links, visit the EcoStruxure Power Commission website.
EcoStruxure Panel Server webpages
EcoStruxure Panel Server includes a web server with webpages for commissioning compatible devices and sensors. For information on Panel Server webpages, see the EcoStruxure Panel Server user guide.
Device and application specific configurations
WAGES An acronym for water, air, gas, electricity, steam. It is used to describe the commodities consumed by a building or business. For example, the building's water consumption or fuel gas consumption. pulse monitoring with EcoStruxure I/O Smartlink
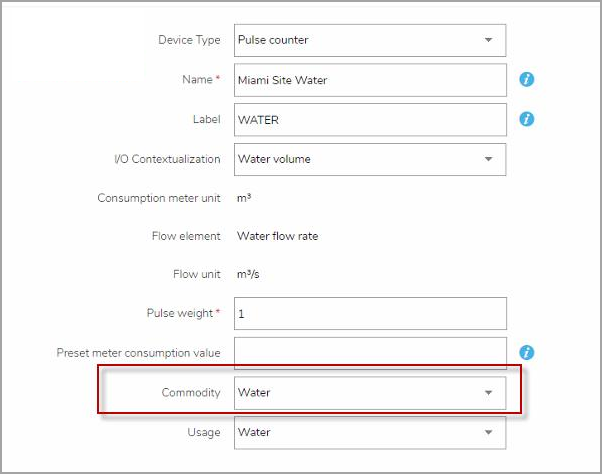
When commissioning an EcoStruxure I/O Smartlink device for monitoring water, gas, or other commodities through the Panel Server, set the Commodity setting in Panel Server to the one monitored by the device. This is required to import the data into Energy Hub with the correct measurement.
To illustrate this, the following shows a screen capture of the Panel Server configuration page for Smartlink:
Multi-circuit meter – circuit naming
NOTE: Multi-circuit meters, such as the HDPM6000, are only supported by the Site Server gateway.
Site Server creates individual sources for each circuit of a multi-circuit meter based on the circuit name. If a circuit is renamed, Site Server creates a new source. This new source is independent of the previous one, meaning new data is logged for the new source, and the previous source stops logging data.
To avoid unintended source creation and data continuity issues, follow these best practices:
- Do not rename a circuit on a multi-circuit device unless you intend to create a new source.
- Keep a record of circuit names and configurations when upgrading firmware on a multi-circuit device. This helps with recovery in case of an unsuccessful upgrade.
Resources
For additional information on devices, gateways, and tools, see resources.
Quick start
Follow these steps to get a quick start on your system setup:
- The goal of this quick start guide is to get your system up and running quickly. It does not cover the complete configuration of your system.
- You need the Energy Hub web application to complete all the quick start steps. The mobile app offers limited support for system setup tasks.
Prerequisites
To get started with Energy Hub, you need:
- At least one monitoring device installed in your facility that provides energy system data for an electrical load.
- A communication gateway that sends the measurement data from your monitoring device to Energy Hub over the internet.
- A computer to access the Energy Hub web application over the internet.
Step 1 - Get a Schneider Electric ID
NOTE: Skip this step if you already have a Schneider Electric ID.
A Schneider Electric ID is an account you use to log in to all Schneider Electric services, including Energy Hub. You can get a Schneider Electric ID by registering on the Energy Hub login page. For step-by-step instructions on how to get a Schneider Electric ID, see To get a Schneider Electric ID.
Step 2 - Log in to Energy Hub
Use your Schneider Electric ID to log in to Energy Hub on the Energy Hub login page.
Step 3 – Create an organization in Energy Hub
NOTE: Skip this step if you already have an organization.
An organization is a logical entity that represents your business. You set up an organization to model your facility, energy networks, and usage types. You can create an organization as part of the initial Energy Hub setup process when you get your Schneider Electric ID, or later. For step-by-step instructions on how to create an organization, see To create a new organization.
Step 4 - Build your organization model
NOTE: Skip this step if you already have a site.
An organization in Energy Hub can have regions, sites, buildings, floors, and other locations that represent your real-world facilities. For a quick start, set up one site for your organization. Follow the instructions in To add a site to set up the site.
NOTE: Adding a region is optional. You can add a site directly under your organization.
Step 5 – Add your communication gateway to Energy Hub
The monitoring devices and communication gateways installed in your facility provide the measurement data for your energy system. To see this data in Energy Hub, you need to add the gateways to your organization. When you add a gateway, all monitoring devices that are connected to it are automatically added as well. For a quick start, add one communication gateway to your organization. Follow the instructions in To add a gateway to complete this task.
Step 6 - Create or activate your Energy Hub subscription
Energy Hub feature plan subscriptions determine the features that are available to you in Energy Hub. You need a subscription to fully configure Energy Hub, access the features, and view energy system data. To learn more about subscriptions, see Energy Hub subscriptions. You can buy a subscription online through the Energy Hub web application or offline through your Schneider Electric sales representative. The online purchase can be completed immediately, purchasing offline takes longer.
For step-by-step instructions on how to create an online or offline subscription, see To create a new subscription. For instructions on how to activate an offline subscription after you have received the activation code, see To activate an offline subscription.
Step 7 - Add loads and assign usage types
To see energy system data, your organization model needs to include the loads and energy supplies you are monitoring in your facility. In Energy Hub, loads and supplies are represented by the monitoring devices that are monitoring the real-world loads and supplies in your facility. Usage types categorize energy consumption and supply based on a standardized set of end uses and supply types. For example, Lighting is a consumption usage type, Renewable power source is a supply usage type.
In this step, you add load and supply monitoring devices to locations in your organization model and assign usage types to them. For a quick start, add one load monitoring device to one location and assign a usage type to it. Follow the instructions in To add a load or supply and assign an energy usage type to complete this task.
Step 8 – View your energy system data
To see energy data trends, rankings, alarms, and more, go to Investigate. For a high-level tour of the main functions and user interfaces in Energy Hub, see Functions and user interfaces (UIs).
Next steps
The goal of the quickstart is to get your Energy Hub system up and running. The next step is to complete your system configuration by:
- Improving the organizational model by adding and refining locations. For more information on the organization model, see Organizations.
- Adding additional monitoring devices to your electrical system and making them available in Energy Hub by adding them to your communication gateway.
- Adding more loads and supplies to your organization in Energy Hub.
- Adding water and gas monitoring devices to your facility.
- Adding virtual devices in Energy Hub to monitor unmetered electricity, water, and gas consumption.
- Building a single-line diagram for your site.
- Inviting users and configuring user roles and access permissions. For information on users and user management, see Users.
Use the navigation topics available on the Help home page to learn more about Energy Hub and how to use it.